Archive | June, 2011

Cinnamon Vanilla Bean Almond Butter

29 Jun

Hi there!  I’m just popping in today to let you know that I created a stellar new nut butter.  Cinnamon Vanilla Bean Almond Butter, anyone?  If you said “Yes, please!”, then head on over to Get Healthy with Heather to get the recipe.

I’ll be checking in again later this week with a sweet treat perfect for your 4th of July celebrations.  I’ll give you a hint… once you have one, you’ll be asking for s’more. 😉

Zucchini Lasagna

27 Jun

One of the best things about the blogging community is its infinite amount of inspiration.  There are so many bloggers and countless recipes that the possibilities are truly endless.

This recipe is the love child of two stellar recipes, Lightened-up Lasagna from meals & moves and Zucchini Quinoa Lasagna from Peas and Thank You.

I love the idea of using zucchini in place of noodles for the added nutrition and flavor.  And using cottage cheese in place of ricotta is brilliant since it’s chock full of protein!  I’m always looking for more ways to incorporate protein into my diet.  (Vegetarians; you could even leave out the meat and still be left with a protein rich meal.)

Zucchini Lasagna

Ingredients:

  • 1 lb grass-fed ground beef
  • 1 cup tomato sauce
  • 1 cup cottage cheese
  • 1 egg
  • 1 zucchini slices into strips, lengthwise
  • 1/2 yellow onion, chopped
  • 1/2 cup fresh basil, chopped
  • 1/2 to 1 cup shredded cheese (I used an Italian blend.)
  • 1/2 Tbsp dried parsley
  • 1/2 Tbsp dried oregano
  • 1 tsp garlic powder
  • 1 tsp salt
  • 1/2 tsp pepper
  • 1 Tbsp olive oil

Directions:

  1. Preheat oven to 350.
  2. Place an oiled skillet over medium heat and cook onions until translucent, about 5 minutes.  Add ground beef and cook until browned.  Drain fat once the beef is cooked through and add the tomato sauce to the skillet.  Heat thoroughly.
  3. Meanwhile, in a small bowl, mix cottage cheese, egg, and parsley through pepper.
  4. Lightly oil a 9×5 loaf pan.  Begin layering your ingredients; start with a single layer of zucchini, then add half the cottage cheese mixture, and half the beef mixture.  Repeat once more and top the final layer with shredded cheese.
  5. Cover with foil and cook for 15 minutes.  Remove the foil and cook for another 10 minutes, or until cheese begins to bubble.
What recipes blog-inspired recipes have you created?

On the Lighter Side: Deviled Eggs

23 Jun

Deviled eggs always remind me of picnics.  When I was a kid, my mom would make them as a special treat to have along with our sandwiches and juice boxes.  We’d eat them on top of a picnic blanket while waiting for the 4th of July fireworks or in the backseat of the car after a fun day at the amusement park.

While I love my mom’s version and they’re great for an occassional treat, I decided to make a lighter version that can be enjoyed more frequently.  In place of mayo, I used protein packed Greek Yogurt which made for an extra creamy filling and a little bit of hummus provided a whole lot of flavor. 

These deviled eggs would be great as a healthy appetizer served before a meal off the grill or as lighter finger food when you have a few friends over.  You could even make a meal out of them, much like Alex and I did.  You and your guests won’t be disappointed.

Deviled Eggs

Ingredients:

  • 6 eggs
  • 2 Tbsp greek yogurt (I used Fage Total 0%)
  • 1 Tbsp hummus
  • 1/4 to 1/2 tsp garlic powder
  • 1/4 to 1/2 tsp salt
  • dash of pepper and paprika

Directions:

  1. To hard boil the eggs, place them in a saucepan and fill the pan with cold water just until the eggs are covered.  Place the pan over high heat and bring the water to a boil.  Once it is boiling, cover the pan and remove it from the heat.  Leave the cover on for 12 to 14 minutes.  Drain the hot water and dunk the eggs into ice water.  Let them sit in the water until they are cool to the touch.  Peel the eggs.
  2. Slice the eggs lengthwise and place the yolks into a small bowl.  Add the rest of the ingredients, except paprika, to the bowl and mix with a fork.  Fill each egg white with a scoop of filling and dust with paprika.

Do you have food that reminds you of summer time picnics?  Do you like deviled eggs?

Caprese Stuffed Chicken

21 Jun

Without question, the combination of fresh mozzarella, plump tomatoes, and fragrant basil is divine.  Caprese salad is the quintessential summer salad; summer being the peak season for each component.  It is refreshing and satisfying without weighing you down. 

What better recipe to share for the first day of summer than a chicken dish inspired by this delightful salad?   

Caprese Stuffed Chicken

Ingredients:

  • 2 large chicken breasts
  • 4 slices of fresh mozzarella
  • 2 Tbsp fresh basil, diced
  • 2 Tbsp pesto
  • 1 Tbsp olive oil
  • salt and pepper
  • 1/4 cup tomato sauce

Directions:

Preheat oven to 350 degrees.  Slice chicken breasts open on the side so that a nice, long pocket forms.

Cover the interior of the chicken breast with one tablespoon of pesto.  I used Buitoni.

Next, slice the mozzarella and dice the basil. 

Insert one slice of mozzarella and one tablespoon of basil into each chicken breast.  Season the exterior of the breasts with salt and pepper.

Heat olive oil in a skillet over medium heat.  Sear the breasts for one minute per side then cook the breasts on a greased baking sheet for 10 minutes.  Remove from the oven and top each breast with about two tablespoons of tomato sauce.  Cook for another 15 minutes and then top the chicken with a slice or two of mozzarella.  Cook for another 5 minutes, until the cheese is melted.

This dish was so flavorful!  The pesto on the interior of the chicken breast added so much to the dish but the true star of the show was the mozzarella.  It was perfect melted both on top and inside the chicken.  I’ll definitely be making this dish again!

Have you ever had caprese salad?  Do you have any derivations from the traditional recipe?

Zucchini Oven Chips

19 Jun

Now that the warm weather is here and the official start of the season is only two days away, everyone is gearing up for summer.  Summer is a time for getting together with family and friends to enjoy the beach, pool parties, or cook-outs.  Often times that means heavy, unhealthy side dishes like potato salad or chips and dip.

It’s understandable as to why these foods are so popular; they’re quick and easy to prepare which allows you more time with family and friends.  However there are healthy options that will help lighten your load (pun intended).

Zucchini oven chips are very easy to prepare and they’re full of flavor.  Fresh out of the oven, they’re light and crisp.  Even the veggie haters will love this one!

Zucchini Oven Chips
(adapted from My Recipes)

Ingredients:

  • 1 large zucchini
  • 2 Tbsp milk
  • 1/3 cup planko bread crumbs
  • 1/3 cup grated parmesan cheese
  • 1 tsp garlic powder
  • 1 tsp salt
  • 1/2 tsp pepper

Directions:

  1. Pre-heat oven to 425 degrees.
  2. Combine the last five ingredients in a shallow bowl.  Mix well.
  3. Chop zucchini and dip zucchini pieces in milk.  Dredge the pieces in the breadcrumb mixture.
  4. Coat an oven safe cooling rack with cooking spray and place it on top of a baking sheet.  Lay the zucchini pieces on the cooling rack and spray with additional cooking spray.
  5. Cook for 30 minutes, making sure to flip the chips halfway through.

Next time you’re in need of a tasty and healthy side dish, give these a try.  Make sure to have an extra zucchini on hand as your family will surely be asking for more!

What’s your favorite summertime side dish?

Cinnamon Raisin Muffins

16 Jun

Even before June arrived, I knew I wanted to make a foodie gift for Father’s Day.  I did the same for Mother’s Day and it was very well received! 

So I got to thinking about foods that my dad enjoys.  The first couple of items that came to mind were obvious steak, bacon, or anything meat related.  Since I couldn’t very well mail him a steak, I continued to rack my brain for other ideas when it dawned on me.  Some of his favorite foods involve cinnamon; cinnamon ice cream and brown sugar cinnamon Pop-tarts to name a couple.  I scoured the internet for cinnamon based recipes and ultimately decided to customize my own cinnamon raisin muffins.

One key component to adapting a baked good recipe is keeping the correct ratio of wet to dry ingredients.  If you have too much of the former, your muffin will end up soggy or under cooked but with too much of the latter, you’ll have a dry, hard rock-like muffin.  I didn’t want to send my dad rocks for father’s day.  Nobody likes a repeat gift.

Not only is the correct ratio important, but so is the quality of the ingredients.  This recipe was the perfect opportunity for me to use a new-to-me brand of coconut oil.  Tropical Traditions was nice enough to send me 32 ounces of Gold Label Virgin Coconut Oil to sample. 

source

I have cooked and baked with coconut oil in the past and I continue to do so because I love the hint of coconut flavor it adds.  A small amount goes a long way and keeps me satiated for hours.  What I like about Tropical Traditions, is that their virgin coconut oil is unrefined and is made from fresh, organic coconuts.  To find out more about their coconut oil, check out their website.  Many thanks to Tropical Traditions for the sample!*

Cinnamon Raisin Muffins
(adapted from Cooks.com)

Ingredients:

  • 1 cup whole wheat pastry flour (4 oz)
  • 1/2 cup all-purpose flour (2 oz)
  • 1/2 cup old-fashioned oats (2 oz)
  • 1 Tbsp baking powder
  • 1 tsp cinnamon
  • 1/2 tsp nutmeg
  • dash of salt
  • 2/3 cup brown sugar
  • 2/3 cup plus 1 Tbsp applesauce
  • 1/4 cup coconut oil
  • 1 egg
  • 1/2 to 3/4 cup raisins
Directions:
  1. Preheat oven to 400 degrees.
  2. In a large bowl, mix flours, oats, baking powder, nutmeg, cinnamon, and salt.
  3. In a separate bowl, whisk sugar, applesauce, oil, and egg until combined.
  4. Add raisins to flour mixture and make sure to coat all the raisins lightly with flour.
  5. Add the wet mixture to the dry and stir just until combined.
  6. Lightly oil a 12 muffin pan or use paper liners.  Pour the batter evenly among the 12 cups.
  7. Bake at 400 for about 20 to 25 minutes.
  8. Allow for some cooling time and enjoy!

Do you like to make foodie gifts for holidays?  If so, what was the last gift you made?

*Disclaimer: Tropical Traditions provided me with a free sample of this product to review and I was under no obligation to review it if I so chose.  Nor was I under any obligation to write a positive review in return for the free product.

16 Handles

14 Jun

In addition to lovely brunches, I enjoy a lot of frozen treats over the summer.

Whether it be ice cream, frozen yogurt, soft serve, or sorbet, I’m a happy camper.  I don’t discriminate.

One of my favorite fro yo places is 16 Handles.

The location closest to our apartment is relatively new, as in this will be the first summer I don’t have to hop on the subway to enjoy 16 Handles.  Luckily, it’s still about a mile away so it won’t become a daily treat.  And, each time I go, I’m sure to walk at least two miles so that justifies an extra topping, don’t you think?

In case you haven’t been to 16 Handles or a similar type of place, I’m going to tell you all about it.  Each day 16 Handles offers 16 different flavors of frozen yogurt.

The flavors range from peanut butter (my personal favorite) to cake batter to watermelon sorbet, and everything in between.  Everything is self serve so you can get as much, or as little, as you want!

They also have a deluxe topping bar that’s sure to please everyone.

Some toppings include fresh fruit, mini peanut butter cups, cookie dough, and gummy bears, among many others.

On my last trip, I enjoyed peanut butter, banana, and cake batter frozen yogurts topped with brownie bites, peanut butter cups, and graham cracker crumbs. 

Yum!  I can see many more trips to 16 Handles in my near future.

What’s your favorite summer time treat?

Cilantro

13 Jun

Summer has certainly hit NYC.  We had two days last week that were well into the 90s!  Not mention the ice cream trucks are out in full force and most women are wearing skirts or shorts that would make their mothers blush.  Not me of course (Hi Mom!).

One of my favorite summer time traditions is brunch.  Now you may be wondering, why is brunch reserved for the summer?  Well, in theory, it isn’t just a summer time activity but it’s just so much more enjoyable in the warmer weather.  There’s nothing quite like strolling to brunch in the sunshine after spending a lazy weekend morning in bed knowing that I don’t have to cook or clean.  Bliss.

This past weekend, Alex and I went to one of our favorite brunch locales; Cilantro.

Cilantro is a favorite for a number of reasons.  The environment is casual and family friendly, the food is top-notch, and the prices cannot be beat!

As usual, we started our meal with a basket of chips and salsa.  They also offer fried plantains which are great!  Crunchy, salty, and… gone.

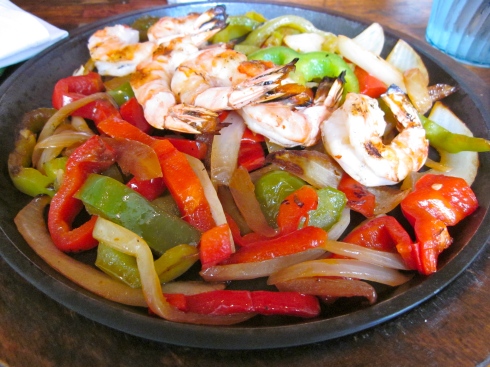
For our entrees, I got the shrimp fajitas with an array of sides and whole wheat tortillas.  The thing I love about fajitas is that you have the ability to make it what you want.  You can be sure that I ate all the shrimp, peppers, and guacamole 🙂

Alex got his usual dish; steak and eggs.  He got this entire dish for $8!  I’m telling you the prices are ridiculous.  Let’s just hope no one from Cilantro reads this and increases the prices, haha (highly unlikely, indeed).

As always, we left as two very happy customers.  If you’re ever looking for a great brunch place on the upper east side, Cilantro never disappoints.

What’s one summer time tradition that you love?

Pepperoni Pizza Pull Apart Bread

12 Jun

My infatuation with bread baking has not ceased.  Last weekend, when I was home, I made a loaf of Victorian Milk Bread that I hear was great.  Unfortunately, I was on a flight back to NYC when my family was enjoying it, so I never got a chance to try it.  At least they got to partake in some of my culinary experiments!

This weekend I attempted a different kind of bread all together; pull apart bread.  If you’ve never heard of it, I’m sure you can figure out what it’s all about from the name.  Let me tell ya, it’s a lot of fun to pull the loaf apart and enjoy it layer by layer.

I’d never made pull apart bread before so I wasn’t sure how it was going to turn out.  I needn’t have feared.  This bread was phenomenal!  Between Alex and I, the loaf was gone in a day.  What can I say?  We love soft, pizza flavored bread that melts in your mouth.  And chances are, you will too.

Pepperoni Pizza Pull Apart Bread
(adapted from Kirby’s Cravings)

Ingredients:

  • 3 cups bread flour
  • 1 cup of warm water
  • 1 packet of active dry yeast (2 1/4 tsp)
  • 2 Tbsp sugar
  • 1 tsp salt
  • 3 Tbsp of melted butter, divided
  • 2 tsp basil
  • 1 tsp garlic powder
  • 1 tsp oregano
  • 1/2 tsp salt
  • 1 1/2 cup Italian blended cheeses
  • 10 to 20 pepperoni slices, chopped

Directions:

Gather your ingredients.

In a small bowl, mix sugar, yeast, and water.  Allow the mixture to stand for 5 to 10 minutes, until the yeast becomes foamy.

Once the yeast is foamy, add two tablespoons of butter and mix.

In a separate, larger bowl, add the flour and one teaspoon of salt.  Make a well in the middle of the flour mixture.  Pour the yeast mixture into the well and slowly beging to incorporate the flour.

At this point it may seem that you have too much flour but continue mixing and the dough will come together.  Once most of the flour has been incorporated, turn the dough onto a clean counter and knead for 8 to 10 minutes.  The dough should become smooth and elastic.

Grease a large bowl with olive oil (or cooking spray).  Insert the dough and turn it to cover with oil.  Cover the bowl with cling wrap and leave in a warm place for one hour.

We’ve been running the air conditioning since we’ve been experiencing some really high temps.  So, I was worried our apartment wouldn’t be warm enough for the dough to rise.  To remedy this I turned on the oven and placed the bread on top so that it would heat right up.  It worked like a charm.

Once the dough has doubled in size, rolled it out onto a floured countertop until it’s about 1/4 of an inch think.  Brush the dough with one tablespoon of melted butter and sprinkle the seasonings on top.  Next, cover the seasonings with cheese and chopped pepperoni.

Cut the dough into 2″ x 3″ squares and layer them into a 9 x 5 loaf pan lined with parchment paper.

This step was tricky for me.  The cheese and pepperoni did not want to stick to the dough and I couldn’t get the squares to stand up right.  So, I tipped the pan upright at a 90 degree angle and began to insert the squares.  It worked much better.  I still had some loose cheese that fell onto the countertop so I just sprinkled it on top of the loaf.  It still turned out lovely.

Once your loaf is formed, cover it with a damp towel and allow it to rise for about 40 minutes.  I placed mine on the stove top again.

Now that the dough is nice and fluffy, place the loaf into the a 350 degree oven for 30 to 35 minutes.  To check that the bread is cooked throughly, insert a knife into the middle make sure it comes out clean.  Then you’re ready to dig in!

Yum!  This recipe is a keeper.  I hope you and your family enjoy it as much as we did 🙂

This post has been submitted to Yeastspotting.

NYRR Mini 10K

11 Jun

This morning was the annual New York Road Runners Mini 10K.  The Mini started in 1972 marking this year as the 40th year.  It began as a celebration of women’s running; a celebration that continues to this day.

This year’s race was dedicated to Grete Waltz.  Grete was  a nine-time NYC marathon winner and five-time Mini 10K winner.  Just two months ago, she lost a long battle with cancer.

It’s humbling and inspiring to think of Grete and all the strong women runners that have paved the way for the rest of us.  When I was struggling to get to the finish line, I thought of all that they’d accomplished, and it gave me the strength to keep going.

I covered the entire 6.2 mile course in 54 minutes and 3 seconds.  I couldn’t be happier.  It isn’t a personal record, but I know that I gave it my best!  I’m already looking forward to next year’s race 🙂

Have you ever run a road race?  Did you enjoy it?